20 minutes
Useful git commands for SRE and DevOps engineers
Table of contents
- Introduction
- Why use git ?
- Git
- Github
- Git Terminologies
- Git operations
- git config - Add origin
- git init - Initialise a new git repository
- git remote add - Add origin
- git remote set-url - Change url of origin
- git remote rm - Remove origin
- git clone - Clone repostory from remote server into your local
- git status - Check status of working directory
- git checkout - Swiss army knife
- git branch -m - Rename a branch
- git branch -d - Delete a branch
- git branch -a - listing branches
- git show - view specific commit changes
- git log - view logs
- git add - Add changes to staging area
- git clean - Remove untracked files from tree
- git commit - create new commit
- git commit –amend - ammend last commit messages
- git revert - revert last commit
- git reset - reset last commit
- git rebase - delete commit
- git fetch - Fetch latest changes
- git pull - Pull latest changes
- git push - Push committed changes to remote repository
- git merge - Merge two branches
- git stash - Stash changes in dirty working state
- git rebase - Rebase branch to a new base commit
- git cherry-pick - Pick commits from other branch to current branch
- git blame - Check revision and author who last modified each line of file
- git tag - Create a new tag
- Pull requests
- Fork
- Branch naming convention
- Things to consider committing
- Conclusion

Introduction
The goal of this article is to share knowledge about git. over my working experience as an SRE, i came across alot of git intricacies. However, those were only 1% of the time. 99% of the time, it was just the usual normal git operations. This article aims to educate all the important git commands and operations that you need to know while working in tech.
Why use git ?
The first thing that comes our mind before using tools like git is, why use it ? Why not just copy and paste code or make multiple folters or backup in USB drive.
Well that works, until it does not. Then you are left will multiple copies of same file, no organisation, no management, no rollback option.
So simply put, we need to use git for these main reason.
-
Flexibility
-
Security
-
Version control
Git
Git is a software / tool to help you track changes in your code. You install it on your computer and use it like any other CLI programs. Git is open source software created by Linus Torvalds ( Creator of Linux ) :)
Github
Github is a web service which provides features to store your code online and share it with your fellow programmers. You can also perform git operations online as well via Github. Github is owned by Microsoft :(
Git Terminologies
Repository
Repository or Repo ( in short ) is the .git folder inside your project which tracks all changes in your project and builds a history. Do not ever ever delete your .git folder in your repository. You will lose all of your git history.
Upstream and Downstream
upstream is from where you clone the repository where as downstream is the projects which uses your own in their own repo.
Suppose if i fork a repo called A from any github repo, then for me A will be a upstream repository and for A, my fork will be a downstream repo.
You cannot directly push changes to upstream repo ( original repo ) unless allowed, hence we would need to create a fork and set our repo as upstream repo for local repository
This can be done using
git remote add upstream <URL>
git push --set-upstream-to origin master
Branch
A branch in git is an identical copy of your current changes tracked in git. When a repository is initialized, by default git created a default branch named main or master. Think of this like an inverted tree where main trunk is master/main branch and each separation from trunk is called a branch.
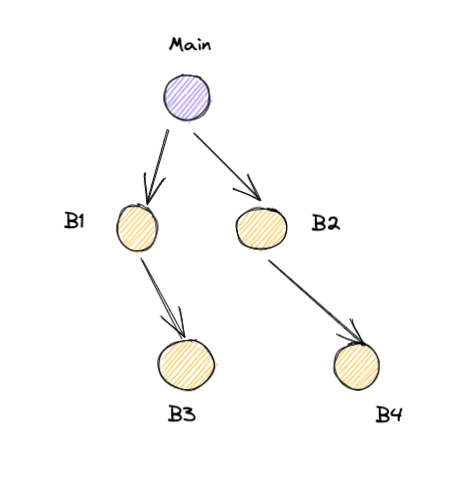
There are two types of branches in git.
-
Local
-
Remote
Local branches are the branch you create in your workspace. Only you can see this branch and it exists only on your machine.
Remote branches are the branches which can be viewed by everyone.
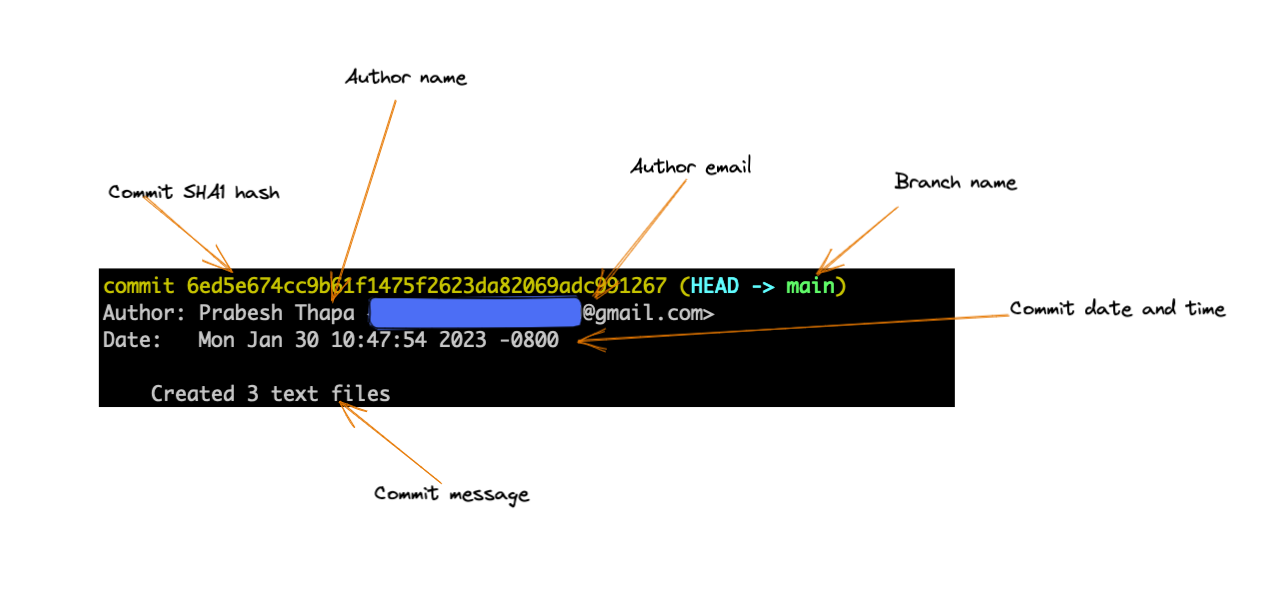
Commit
A commit in git is a snapshot of the changes which has been staged. By staged, it means files that were tracked by git. Non stages or non tracked files will not be captured in a git commit.
Each commit is a unique SHA1 hash value which looks something like this 201118dbdf8703a12212c7a4bb0876b78913d4e6
Commits are immutable which means they cannot be changes. They are unique however, if two person start at the same date and time, commit same files, set same git author will produces same git hash.
Each git commits are generated from following parameters
sha1(
    commit message  		=> "This is my commit message"
    committer       	   	=> Prabesh Thapa < [email protected]>
    commit date          	=> Sat Nov 8 11:13:49 2021 +0100
    author                  => Prabesh Thapa < [email protected]>
    author date            	=> Thu Aug 19 11:13:49 2021 +0100
    tree                    => 9c435a86e664be00db0d973e981425e4a3ef3f8d
    parents                 => [0d973e9c4353ef3f8ddb98a86e664be001425e4a]
)
Another thing to note here is, committer date and author date. author date is the date when the file was initially created where as committer date gets changed each time commit is modified.
Note that if you modify anything from above listed items then result will be a completely new commit. When people say they are modifying the commit, instead of modifying, they are re-creating a completely new commit and replacing it.
Origin / Remote
Origin is a short name for remote repository from where the project was initially cloned from. If you create a git repo locally, then there will not be any origin. For any cloned repository you can view the origin using git remote -v command.
$ git remote -v

origin  [email protected]:pgaijin66/blog.git (fetch)
origin  [email protected]:pgaijin66/blog.git (push)
HEAD
HEAD is a special pointer which points to the current branch. HEAD tells us where our current branch is pointing towards. This helps us know, on which branch we are working on.
You can do few tweaks to your terminal to make these information obvious. I use oh-my-zsh theme on mac with robbyrussel theme which shows be which branch i am in. robbyrussel is minimal, does not take much space of my terminal realestate. There are other themes as well which you can use.
➜ blog git:(main) ✗
Gitignore
gitignore file is used to tell git not to track files intentionnally. We use this when we don;t want to track folders will 100s of small files i.e node_modules or making sure secrets are not committed to git
To use it, we just create a file called .gitignore
touch .gitignore
regular expressions can be used in gitignore to glob multiple files and folders as part of gitignore file.
Git operations
git config - Add origin
git config are used to configure your git as
You can your git username and email
git config --global user.name "Prabeh Thapa"
git config --global user.email "[email protected]"
Now in all the subsequent commits, git will use the above username and email.
You can list all the git configs using following
git config --list --show-origin
My git config looks like this
file:/usr/local/etc/gitconfig   credential.helper=osxkeychain
file:/Users/pgaijin66/.gitconfig        user.signingkey=9BD85959AC85D213
file:/Users/pgaijin66/.gitconfig        user.name=Prabesh Thapa
file:/Users/pgaijin66/.gitconfig        user.email=[email protected]
file:/Users/pgaijin66/.gitconfig        commit.gpgsign=true
file:/Users/pgaijin66/.gitconfig        init.defaultbranch=main
file:/Users/pgaijin66/.gitconfig        fetch.prune=true
file:/Users/pgaijin66/.gitconfig        alias.rename=branch -m
file:.git/config        core.repositoryformatversion=0
file:.git/config        core.filemode=true
file:.git/config        core.bare=false
file:.git/config        core.logallrefupdates=true
file:.git/config        core.ignorecase=true
file:.git/config        core.precomposeunicode=true
file:.git/config        remote.origin.url=[email protected]:dhiki-labs/chhano__web.git
file:.git/config        remote.origin.fetch=+refs/heads/*:refs/remotes/origin/*
file:.git/config        branch.dev.remote=origin
file:.git/config        branch.dev.merge=refs/heads/dev
git init - Initialise a new git repository
To initialise a new git repository, you issue command git init. Once this is initialized, git creates a repository called .git inside your workspace.
➜  git init
Initialized empty Git repository in /home/project1/.git/
git remote add - Add origin
If you have never pushed change to remote repo and repo was not cloned then your git remove -v output will be empty. For this, you can add origin using following command
git remote add origin [email protected]:pgaijin66/git-repo.git
git remote set-url - Change url of origin
Suppose you renamed your repository. When that is done, the repo URL will not be same and now your local repo will not work as it could not find the remote repository. In that case you will need to change the URL which can be done using
git remote set-url origin [email protected]:pgaijin66/different-git-repo.git
git remote rm - Remove origin
You can remote origin using following command to add a new origin.
git remote rm origin
git clone - Clone repostory from remote server into your local
Git clone operation is used when you want to clone the target repository into your local workstation.
git clone https://github.com/pgaijin66/github.git
git status - Check status of working directory
git status is used to display the state of working directory and staging area. This helps you see what files have been stages and what have not. And as we discussed earler, if file is not staged then it is not tracked by git.
$ git status

On branch main
Your branch is up to date with 'origin/main'.

Changes to be committed:
  (use "git restore --staged <file>..." to unstage)
        modified:   content/about.md

Untracked files:
  (use "git add <file>..." to include in what will be committed)
        content/posts/git-for-software-engineers.md
In above example you can see that it has tracked file content/about.md but has not tracked other files. This means, if i were to create a commit now, only changes made to content/about.md would be taken into snapshot and other files will not be tracked.
git checkout - Swiss army knife
git checkout can be considered as swiss army knife of git. There are lot of things that can be done using git checkout
From XKCD
A: What do I run to change the branch I’m on?
B: Use git checkout <branch>.
A: What can I run to discard changes to a file?
B: Use…git checkout <file>.
A: OK…
You can get the status of the repo similar to git status
git checkout
You can discard changes to the file
git checkout file
You can create a new branch
git checkout -b BRANCH_NAME
You can switch to another branch using git checkout
git checkout BRANCH_NAME
You can also switch using git switch. The key difference would be
git switch BRANCH_NAME
Note: The above command works only if branch is present locally. If it is not present locally then you might need to run git fetch BRANCH_NAME before you run git switch
git branch -m - Rename a branch
To rename a branch you would need to do followings:
git branch -m NEW_NAME

git push origin -u NEW_NAME

git push origin --delete OLD_NAME
I use alias called rename for renaming purposes. This way i can use git rename which makes life much easy. You can set alias in git using following command
git config --global alias.rename 'branch -m'
git branch -d - Delete a branch
git branch --delete BRANCH_NAME or git branch -d BRANCH_NAME
Note that -d is not same as -D.
-d deletes branch if ti already fully merged in upstream branch
-D deletes a branch forcefully. It is same as --delete --force
Note: Do not delete remote branch or delete branch from origin unless absolutely sure. You can does not always mean you should. Other people in team might be using that branch.
git branch -a - listing branches
git branch -a
This shows all the branches in local and remote repository.
git show - view specific commit changes
You can view all the logs using git show.
You can make it look nice using
git show COMMIT_ID
you can also see the changes in speicifc commit using
git diff COMMIT_ID^!
Note the ^ and !
git log - view logs
You can view all the logs using git log.
You can make it look nice using
git log --all --graph --oneline --decorate
and even nice using
git log --graph --format=format:'%C(bold blue)%h%C(reset) - %C(bold green)(%ar)%C(reset) %C(white)%an%C(reset)%C(bold yellow)%d%C(reset) %C(dim white)- %s%C(reset)' --all
I use it as an alias in my ~/.zshrc
alias gl="git log --graph --format=format:'%C(bold blue)%h%C(reset) - %C(bold green)(%ar)%C(reset) %C(white)%an%C(reset)%C(bold yellow)%d%C(reset) %C(dim white)- %s%C(reset)' --all"
git add - Add changes to staging area
You can add your changes to staging area so that git can track it.
You can do one by one
git add FILENAME
or all at once
git add -A
git clean - Remove untracked files from tree
git clean can be used to remove
git clean -x -d -n
Where
-x: disregard .gitignore exclusions when cleaning up
-d: clean directories as well
-n: trial run only
Output would look like this
Would remove .dockerignore
Would remove Dockerfile
Once you are happy with the changes, you can remove the -n from above command and re-run the code
Sometime you will get error like this
git:(dev) ✗ git clean -d
fatal: clean.requireForce defaults to true and neither -i, -n, nor -f given; refusing to clean
In this case you can override this with -f and run
git clean -x -d -f

Removing .dockerignore
Removing Dockerfile
git commit - create new commit
git add .
git commit -m "COMMIT MESSAGE"
In above command git add . adds all the changes to staging area and then git commit creates a new commit with message specified by -m "COMMIT MESSAGE"
git commit –amend - ammend last commit messages
Ammendment operating is used when you want to change already committed commit. Ammending operation does not update a commit, it replaces and creates a whole new commit.
git commit --amend
This will open up an interactive terminal where you can update the commit.
git revert - revert last commit
Git revert create a new commit that reverts the change of commit being targeted.
git revert COMMIT_ID
git revert is preferred over git reset as it is much safer and does not alter commit history.
git reset - reset last commit
git reset can be used to undo last commit. Using reset is not recommended. But if you have to use it, you can reset last commit like this. unlike revert this will remove commit from git log.
git reset --soft HEAD~1
Remember to use --soft as it means you will not lose the uncommitted changes. Uncommitted files are kept into stage to be committed again where as using --hard they are also discarded.
git rebase - delete commit
There are various ways to delete a commit but it is not recommended to do so. If its absolutely necessary, then do this
-
Type
git rebase -i HEAD~5. This will open up an interactive terminal. -
Choose the commits you want to delete, replace work
pickwithdropwhich will look something like this
 create mode 100644 text2.txt
drop af6e021 demo

# Rebase 79a8b14..af6e021 onto 79a8b14 (1 command)
#
# Commands:
# p, pick <commit> = use commit
# r, reword <commit> = use commit, b
Again, this is not recommended.
git fetch - Fetch latest changes
git fetch is used to download objects and references from remote repository. All the references for the local branches are stored in .git/refs/heads. When we do git fetch it updated the references
Before git fetch
ls ./.git/refs/heads/
main
branch1
After git fetch
ls ./.git/refs/heads/
main
branch1
feature1
Here you can see that feature1 branch was not present in my local refs but was present in remote repository. Once we ran git fetch it updated the refs.
Another thing that you need to know if after work, each of the remote branch gets deleted. Some do it by themselves, or have automated system to do it. You do not want those branches lingering in your workstation. This can be resolved using git fetch --prune everytime you do git fetch.
Or you can set remote origin prune to true and this way git fetch and git pull will automatically prune.
git config --global fetch.prune true
Advise: Always becareful when you issue commands like these. You need to be aware of ramifications.
git pull - Pull latest changes
git pull is used to pull the latest changes from remote repository to local repository. git pull basically runs git fetch and the automatically merges after fetching commits. It pulls the latest changes from remote branch and then merges to your local branch.
There are two ways you can pull changes
git pull --rebase
git pull --ff-only
Advise: By default git pull uses the later one which is an curse and blessing. It is a curse as it only tries to merge only if the commits are linear and can be merged using fast forward merge.
once this is done, everytime you do git pull, it will try to do a rebase instead of fast forward merge.
Personally, i prefer using --ff-only as it prevents from unexpected changes from happening to repo local history. --rebase can permanently mutate your git history of the current branch which it does without asking. I often git pull and if it fails. I look at the diverged commits and follow up with git pull --rebase explicity choosing the rabase behaviour.
You can update global configuration to make pull to do rebase using following command
git config --global pull.rebase true
or can update global configuration to make pull to do --ff-only using following command
git config --global pull.ff only
git push - Push committed changes to remote repository
git push is used to push changes to the remote repository. After you commit the changes, you can push the changes using
git push
If it is the first time branch is being pushed to origin then you would neet to set an upstream branch. This can be done using
git push --set-upstream origin CURRENT_BRANCH_NAME
git merge - Merge two branches
git merge is used to merge two branches together. Remember, git merge works when you try to merge branch with its parent branch from where the branch was initially forked from.
git merge BRANCH_NAME
Note that git merges history two different ways. One is using ff or fast forward merge. This happens when there is not changes to the parent branch once the new branch was forked.
Merging is done when your code has been reviewed and is ready to be merged.
Advise: Merge locally before merging via web. This helps to resolve any merge conflicts easily without any mess.
git stash - Stash changes in dirty working state
git stash is used to stash changes that you do not want to commit as its not complete yet but you need to have clear working repository. In such case you can stash changes usinng git stash. It is used when you want to temporarily save your commit somewhere so that you can work on something else.
Stash current changes
git stash
Once you are done with other works, you can pop the stashed work
git stash pop
You can also list all the changes using
git stash list
You can also move current uncommitted change from one branch to another.
git add .
git stash
git checkout -b new-branch
git stash pop
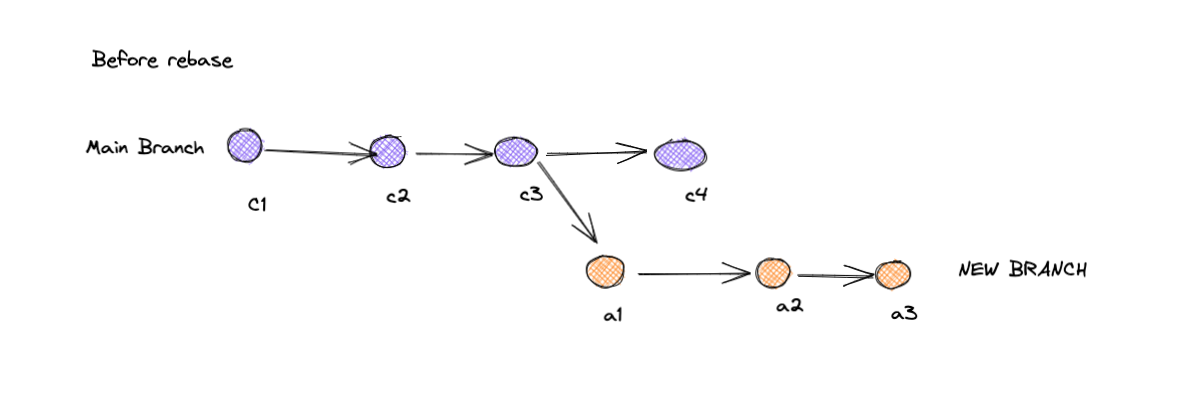
git rebase - Rebase branch to a new base commit
git rebase is used to move the sequence of commits from a branch to a new base commit.
Before rebase
After rebase
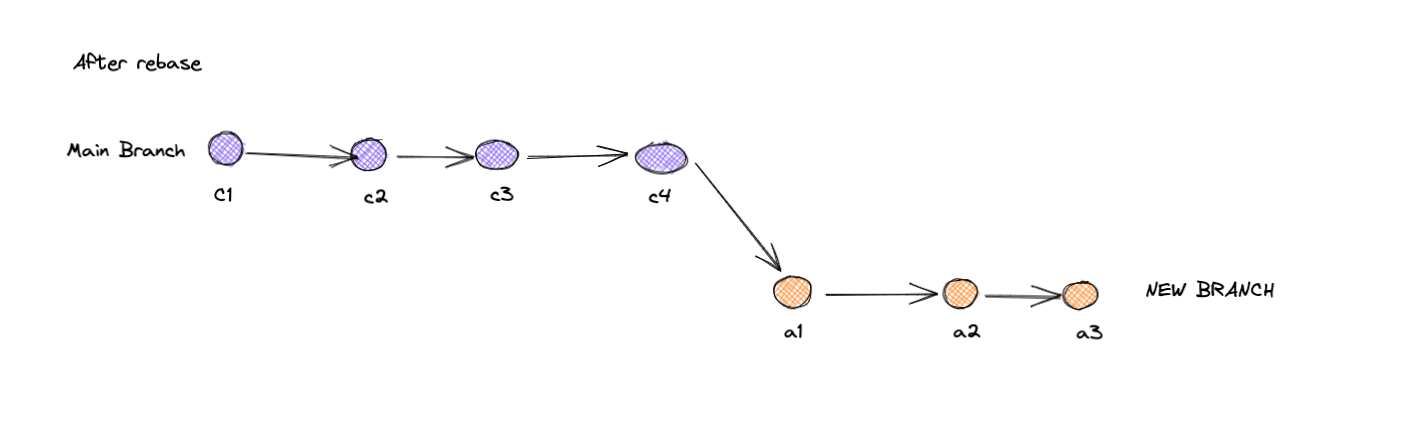
Suppose you are in BRANCH1 and want to rebase to main branch then you would do something like this
git checkout BRANCH1
git fetch origin main
git rebase origin/main
If there are any conflicts, look into those files and verify those commits. You would need to accept the incoming change based on the work.
Once conflicts are resolved then run
git add .
git rebase --continue
git rebase replays all the commits one by one until it reaches to the HEAD. From the diagram, after we rebease, it replays merging commit to c3 first, and then again checks merging with c4. if there are any conflicts along the way, it will stop rebase process and we need to resolve the conflict, if not then the rebase will be successfull.
git cherry-pick - Pick commits from other branch to current branch
git cherry-pick is a big topic which needs a session on its own but i will try to summarise it here. Cherry pick is used to pick commit from another branch into your current branch. You can do cherry-pick by
- Switch to the branch you want to bring in the changes. Double check you are in correct branch.
`git checkout BRANCH_NAME
- Find the commit ID of the commit you want in your branch then issue
git cherry-pick -x COMMIT_ID
-x helps you to add a better commit message which tells something like “cherry picked from asdjhkhjasd”. This way we know that commit was created using cherry pick.
To know more about rebase and cherry-pick, please read here:
guide to cherry picking in git
git blame - Check revision and author who last modified each line of file
git blame is one of the extremely important command that you would need to use as a software engineer. Suppose you need to know who made change in the file and specific part of the code.
git blame FILENAME
This will show each line in file and also show who last modified that part of the line.
For example
if i want to see who made change to file called Auth.module.css in my repo then i would use it as
git blame styles/Auth.module.css
and the output would show me who made change in what part of the code.
2514ca43 (Bishwas Adhikari 2023-01-14 13:20:20 +1100 1) .backButton {
2514ca43 (Bishwas Adhikari 2023-01-14 13:20:20 +1100 2)     background: #F9F9F9;
2514ca43 (Bishwas Adhikari 2023-01-14 13:20:20 +1100 3)     border: 1px solid rgba(2, 62, 138, 0.2);
2514ca43 (Bishwas Adhikari 2023-01-14 13:20:20 +1100 4)     border-radius: 5px;
2514ca43 (Bishwas Adhikari 2023-01-14 13:20:20 +1100 5)     color: #03045E;
2514ca43 (Bishwas Adhikari 2023-01-14 13:20:20 +1100 6)     opacity: 0.5;
2514ca43 (Bishwas Adhikari 2023-01-14 13:20:20 +1100 7)     font-weight: lighter;
2514ca43 (Bishwas Adhikari 2023-01-14 13:20:20 +1100 8) }
(END)
git tag - Create a new tag
git tag is used to create a new tag
You can create new tag using
git tag v0.0.17
To push tags
git push --tags
Delete tags
git tags -d v0.0.17
Pull requests
PR is created when you want someone else to view and validate your code before you merge into the main branch.
Advise: Keep PR small.
We used to use SHOW/SHIP/ASK strategy while creating PRs and it really does improve the quality of the work.
Here are few ettiquettes you can follow for PR: Unwritten guide to do an effective Pull Requests Review ( PR Review )
Fork
Fork is a copy of the original repository that you manage. This way, you can make changes to the project without affecting original repository. This is generally done, when contributing to open source or contributing to public repo.
-
Create a fork
-
Make changes
-
Create a PR to merge to original repo.
Tutorial here: https://www.earthdatascience.org/workshops/intro-version-control-git/about-forks/
Branch naming convention
There is no hard and fast rule to create branch in git. A proper branch naming will make your life much easier and also manageable. There are various ways and it depends on what standard company wants to follow.
In general a branch name should be short and well defined and could start with something like these
feat      Feature I am adding or expanding
bug       Bug fix or experiment
docs      I am updating the documentation
demo      Throwaway branch created to experiment
This way anyone can check which branches are in what stage of the work i.e if i want to see how many test branches are there i would just do
git branch --list "demo/*"

demo/tesing-login
demo/making-gui-changes
Things to consider committing
-
Commits should focus on a single ‘unit’ of change.
-
Commits should generally tend to be smaller, rather than larger
-
Commit messages are for explaining the reason behind the change.
-
Commit messages should have the Jira ticket number or any identifier which can be used to identify commit with work related to it.
-
There should be at most 1 linting commit. If there are more squash them.
-
No two commits in a row should have the same commit message
-
Avoid commit messages that say “Fixed up as per PR comments” are to be avoided
Conclusion
So there are the things that you will encounter while working as a engineer in IT. Some are easy to grasp and some require time and experience. Eventually you will get on top of it.
Always follow following git mantra
commit often
perfect later
push once